EDIT 2015:
Anyone following my two guides on headlight problem troubleshooting should follow Part A first (at least until the end of Step 1) then continue to follow Part B if necessary.
THE WHY
Retractable headlights are great - except when they fail to go up and down as they should. Not having had a problem with mine in the two years I've owned my 944 I was expecting another trouble free winter. No such luck this year. As the cold weather set in I noticed that the headlights were a lot slower the raise and lower than they had been in the summer. This went on for one or two weeks before returning home one evening I switched off the headlights as usual only for them to stay in the raised position. It was late and the headlamps had gone out so I thought it no harm to leave them up over night and investigate the problem in the morning. What I failed to realise was that even if the headlamps switch off and the lights stay in the raised position then your rear lights still stay on! Hence in the morning I was greeted with a flat battery. So to prevent a flat battery it is always worth remembering to wind down the headlights manually using the black knob located on top of the lifting motor (you'll need to remove the black rubber rain cover first) should you find yourself in a similar situation.
I began by researching the problem on the Pelican Parts forum that evening and it seemed that problems with the headlights fall into few areas (the most common seem to be the first three):
1.) Binding of the lifting linkage/mechanism
2.) Molex connector and/or Relay on the motor housing
3.) Electrical problems relating to the switch on the dashboard
3.) Electrical problems relating to the switching mechanism attached to the lifting motor
4.) The lifting motor itself.
THE TASK
Getting at the bolts for the lifting motor and mechanism is a bit of a fiddle so it's a good idea to have a couple of options to get the bolts undone in the confined space. I did it with the help of the following:
10mm socket
10mm spanner
13mm socket
13mm spanner
Cross-head screwdriver
Flat-head screwdriver
Lithium grease
WD-40 or some other spray penetrating oil
Gunk spray degreaser
Molex Pin Removal Tool (optional and very hard to find)
Wire cutters
Blade connectors
Electrical Multimeter
THE HOW TO
(Amateur mechanic job time 1-3 hours depending on problem)
Step 1 - First things first, start by checking the fuse for the headlights on the fuse board is ok.
Step 2 - Pop the bonnet and pull back the rubber boot (Part No. 477 971 923) that protects the electrical connections to the lifting motor (as you can see from the photo the rubber boot on mine was perished, so I just ripper it off and bought a new one to go on later)

Now you can see the Molex connector (upper arrow) and headlight relay.

Pull off the Molex connector and check the pins aren't corroded (these look good to me), then connect it back to the motor and try to switch on the headlights, if nothings changed move onto the next step.

Now remove the relay, check the 4 contacts for corrosion and then reconnect it. Try the headlights again. If there's no change then we need to test the relay with an electrical multimeter (replacement relays are about £16 from memory).
Here's a really easy tutorial for testing the relay
If none of the above help solve your problem then it's time to check the lifting mechanism itself
Step 3 - Ideally start with the headlights in the down position. If you need to lower them manually then turn the knob on the top of the motor (shown by the orange arrow - you will need to pull off the rubber cover that is stretched over the motor housing first to expose it).

Then take a 13mm socket or ring spanner and undo the nut that connects the lifting mechanism to the motor spline (orange arrow shown below). It's a good idea to note, mark or take a photo of the lifting arm position before you undo the nut as this should help you avoid alignment problems later.

Then take a flat bladed screwdriver and separate (orange arrow below shows where to wedge the screwdriver) the lifting arm from the spline. You don't need to remove it from the spline, but just enough so the mechanism becomes slack and moveable by hand.

With this done it's worth checking to see if there's any life in the lifting motor. Try turning the headlight switch on to see if the black knob on the top of the motor rotates (it should start spinning and continue for a couple of seconds before stopping by itself), then try turning the switch off (again the black knob should rotate for a couple of seconds before stopping by itself). If this happens the good news is that you now know that the relay and electrical connections are fine when the load of the lifting mechanism is not attached, so the problem will now be either binding of the lifting mechanism itself and/or an issue relating to how much power the motor is generating (as turned out to be the case with mine - see my motor overhaul procedure in Step 5 later in this post). If the black knob doesn't spin at all then you'd be wise to first try Clark's Garage tutorial for a comprehensive electrics overhaul procedure before following my motor overhaul procedure later in this post.
Step 4 - Now we'll take a look at binding of the lifting mechanism. First thing to do is try to raise and lower the headlights by actuating the linkage by hand, this can be a little tricky and you may need to get your fingers under the front edge of each headlight to help them up. You should feel that the linkage movement is smooth and not all sticky at any point; raise and lower the headlights slowly and see if they are catching or rubbing at any point. I noticed on mine that the black plastic surround on the passenger-side headlight was not seated correctly and was ever so slightly rubbing on the inside of the body work. I adjusted it to solve the problem and then decided to degrease and re-grease all the linkage pivots as they looked like they could do with an overhaul. I used some spray degreaser, old toothbrush to clean all the linkage points before using lithium grease and some cotton buds/Q-tips to re-grease and oil all the linkage points as shown in the three photos below (orange arrows show the points that were degreased and then re-greased, blue arrow shows where you need to squirt penetrating oil on the inner pivot post and outer pivot of each headlight).
(Non-lifting motor Side)
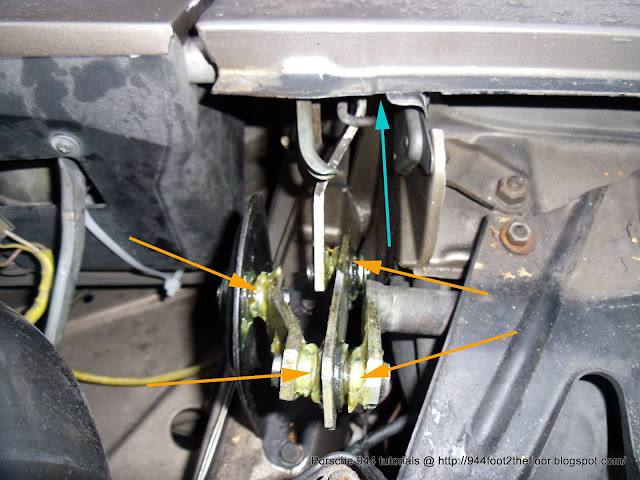
(Lifting motor side)

(Outer Pivot)

(Inner Pivot post bracket shown by blue arrows in 1st and 2nd photos above)

Here's a before, during and after shot to show the difference

Once all the points have been re-greased work the linkage up and down a few times to make sure the grease settles in. My linkage motion was now noticeably smoother. The next step involves re-attaching the 13mm nut that secures the lifting arm to the motor spline, making sure the headlights are in the fully down position and the headlight switch is set to off before you do so. Refer to the notes, markings or photos you should have made before you removed the nut to make sure the arm goes back in the same position it came off. Once the nut is tightened test the operation of the headlights to see if you've solved the problem. If like mine the headlights still failed to rise or lower better than they were before you need to progress to the next step.
Step 5 - Motor Assembly Overhaul Procedure
The motor assembly (shown below) can be removed and dismantled by following the general overhaul procedure at Clarks Garage.

As per Clarks guide I was expecting to see a whole load of corrosion on the contact wheel (pictured below) once I had removed it from the assembly. But in fact there was only a minor amount on the bottom left quarter. It's also worth pointing out here that a small ball bearing sits in the centre of the wheel (the small hole in the centre of the wheel is where it sits) and this can be easily lost and/or overlooked when removing the contact wheel and the plate that covers it.

The corrosion was easily cleaned off using some fine emery paper.

Also inspecting the teeth on the wheel revealed they were in good shape too.

The copper brushes on the brush plate (shown below) for the contact wheel were also in good condition.

The next step was to check the brushes and commutator (sometimes referred to as 'com') on the motor itself. Start by removing the black know on the top of the motor which simply pulls off.


Nest undo the two large screws that attach the motor housing to rest of the assembly

The black motor housing will then pull off, it may resist slightly because of the power of the magnets inside. The next step involves removing the motor coil itself. To do this you only need to undo the green screw (shown below) and remove the locking plate beneath it.


You can now carefully pull the motor coil free from the assembly, notice the 2 sprung motor brushes either side of the copper com these are very delicate and should be inspected for wear. The photos I took of the disassembly of the motor were actually taken as I was putting it back together as you'll notice that the com is a nice shiny copper colour that it should be. This was not the case when I took it apart. Shown below is how the com looked when I first took the motor apart.

As you can see the com is pretty oxidized and running my finger across it I could feel some slight grooving. This was probably caused by the binding of the linkage putting too much strain on the motor and would explain why the headlights struggled to raise and lower.
To clean the com I simply clamped the motor coil in an electric drill and gave it a few hundred rotations with some fine 600 grit emery paper.

The result as you can see is much better

The motor was then reassembled in the reverse that it was taken apart. If you have trouble keeping the brushes out of the way whilst you re-insert the motor coil just tape them inside their holders with some insulation tape that you can easily pull away once the com is sitting between them.
Also before using Clark's tutorial to put the motor assembly back together I used some switch grease to protect the contact wheel from corroding in the future (this picture also shows the ball-bearing sitting in the centre of the wheel before the brush plate goes back on).

I reattached the motor assembly back inside the car with 3 x 10mm nuts. Before clamping up the 13mm motor spline to linkage arm nut you need to connect up the electrics and switch the motor on and off to reset it. Before I could do this I need to sort out the rubber boot that goes over the white Molex connector and relay as it had previously perished, so I had the little task of fitting a new one. The slight problem with this is that the rubber boot cover will not fit over the chunky 4 pin molex connector. There are two solutions for this:
1st Method: Use what is known as a 'Pin Removal Tool' (it's the chrome one at the bottom of the set of four that you want) to press all the pins out of the molex connector, feed them through the rubber boot and press them back into the Molex connector in the correct order. The problem with this method is that the 'Pin Tool' is difficult to find and can be pretty expensive. I've read on other forums that using a section from old telescopic radio aerial sometimes works as cheap solution to a pin tool.
2nd Method: Simply cut the wires to the Molex connector quite far back like I did leaving enough space to pass the wires from the Molex connector through the rubber boot and then re-attach using simple blade connectors and some heat-shrink or insulation tape to cover over the connections.


Once the electrics were hooked back up and I'd reset the motor, I then clamped up the 13mm nut on the motor spline to linkage arm and all worked fine. Check out the video below to see the linkage working correctly, notice the rotation of the linkage arm when raising and lowering the lights.
For further adjustments to the alignment of the headlights follow Van Svenson's excellent tutorial video below.
Very informative, well illustrated. I've checked my fuses, relays (3 new ones), and swapped motors (2 known working), and still have no action. My lights were going up and down several times whenever I cut them off. Then one night they stopped in mid-lower and haven't worked since. Trouble may be in light switch, that's about all that's left.
ReplyDeleteThanks. Does the motor turn when it's not connected to the linkage?
ReplyDeleteThanks for the reply. Neither motor will turn, even when I'm holding it in my hand. I've replaced the headlight switch, and have the same result. I remain mystified.
ReplyDeleteAre you absolutely sure the motors you've tried actually work?
ReplyDeleteIn a word, no. I've been taking people's word for it. Perhaps my problem is the loose nut behind the wheel, as they say. I will make absolutely certain I'm testing a working motor, and then we shall see what is what. Thanks.
ReplyDeleteHa, good analogy. You've obviously been testing a lot of things. Since you've replaced the switch (I assume with a brand new one) I'd then test that you are at least getting on and off power out of the molex connector before you even connect it to the motor. If the you are getting on/off power then the problem must lie with the relay (which you say are good), the motor itself (clean the com like I did in my my tutorial) or the wheel and brush mechanism (make sure there's no corrosion on the wheel and that the brushes are actually making contact with it). Don't have the motor joined to the lifting mechanism at any time as you are only adding another culprit into the mix. Only once the motor spins should you connect it to the lifting mechanism.
ReplyDeleteYet another great blog post. I love reading your post, they are alway very thorough, and have great information. I have had some problems with my headlights not working. It turned out to be the motor. I cleaned the com and the headlights worked again.
ReplyDeletewww.only944.com
No problem, glad my findings helped
ReplyDeleteThis is a great way to do the work. Thanks, I actually learned a lot from this post.
ReplyDeleteHappy to help
ReplyDeleteNice article and work! I've had this kind of problem.. try the first step of the procedure.. and the grease up the mecanism just to be sure... that was the problem! Everything work fine !
ReplyDeleteFirst, excellent detailed How-to article. Just one note, when cleaning any commutator like you show one must make sure there is no electrically conductive "dust" residue from the sanding/cleaning on the insulating separators to short out between the copper conductors of the commutator. I know it may seem "obvious", but just a reminder.
ReplyDeleteSame for me, the switch contact wheel was the source of my problem. Thanks for the great write up!
ReplyDeleteNo problem, glad it solved your problem.
Deletehello! i have a problem with my lights! They don't pop up! but when i tern the little screw on the top to the left the automatically open and close once
ReplyDeleteThen you need to follow the instructions here and things should start working. Good luck
DeleteThe molex removal tool can be found on eBay for less than $6.00 U.S. delivered. Make sure it can accommodate .062 diameter size.
ReplyDeleteI just received one today. Removing the molex connector is the only way to replace the headlight motor rubber boot and have the job look professional.
When I remove fuse 37 (late car) the buckets flip up when the fuse is replaced. I have removed the motor and taken all the steps listed above. They will not flip up with the switch but they will go down and everything works smoothly. Is this an indication that the switch on the dash is the problem? Any ideas suggestions would be appreciated.
ReplyDeleteMine is an early 944 and I know there are some differences in the electronics to the later 944 model (which may or may not include the wiring for the headlights too) but it certainly can't hurt to check out the functionality of the main switch if you've done all of the above.
DeleteHi Dave, Mine ia a '79 924. I've found a broken brush inside the com. Do you know hao to repair it?. Thanks for the tutorial, very useful!
ReplyDeleteWhen you say broken brush I assume you mean the brush wire has come detached from the brush at the brush end or the connector tab end?
DeleteDave, do you if there is any way to bypass the headlight motor and leave the headlights in the raised position without affecting the battery? Thank you
ReplyDeleteI think you can set the headlights in the raised position, then unplug the molex connector from the headlight motor and leave it unplugged. Then the switch on the dashboard will still work at turning the headlights on and off I think. Let me know if this works.
DeleteIt worked. Thank you Dave.
ReplyDeleteGreat and thanks for letting me know. Cheers
DeleteGood Day Dave,
ReplyDeleteA word of thanks for the time and effort you have spent - excellent tutorial and illustration. I have a '91 944 S2 and occasionally get the headlight tango, i.e. the headlights cycle up and down when they shall retract. I will look into this over the upcoming weekend and shall let you know.
With kind greetings from Germany,
M.
Good Day Dave,
ReplyDeleteI wanted to thank you again for your guidelines. Successfully repaired the headlights of my 944 S2 last weekend - very happy with that.
First, I have verified that the light switch and cabling works fine.
I have then disassembled the headlight motor and cleaned the rotary disc. The disc has shown only limited signs of wear, but some visible traces of particles smeared between the cut-out sections. I believe that these particles were conductive and have affected proper operation of the headlights; i.e. improper upper end position, then unintentional retraction, improper lower end position, unwanted pop-up and so forth --> "headlights tango".
I have assembled the unit after some careful sanding of the contacts with 600 emery paper and careful alignment, followed by a lubrication with Teslanol contact spray. Cleaned and re-lubricated the linkage/levers, too.
The rubber boot is still available from PORSCHE (Part No. 477 971 923 as you wrote) for 17€ in Germany as of Oct 2018, and I will also replace the relay (a standard relay).
I have seen only one single round of headlights tango since the overhaul. This was at the very first time when activated and the headlights work fine since then. The unit may need several cycles as the cleaned contacts need to form good electrical contact.
Notes to all PORSCHE fans with similar issues:
1) You can easily remove the MOLEX connector pins using common pin removal tools as used by PC modding hobbyists - but avoid the Phobya brand tool, as it is known to break.
2) You can save some time when you start with disconnecting the MOLEX connector and testing this according to PART A of Dave's tutorial. Leave the MOLEX disconnected, which saves you the time for pulling any fuses or for disconnecting the car battery. I strongly recommend you to work on the mechanism with the circuit non-energized - as the linkage can easily cut off a human finger!
Thanks again, Dave - and please keep on creating these very useful tutorials. Let's keep these wonderful Transaxle-PORSCHEs rockin' and rollin'!
Cheers,
M.
Thanks very much for the feedback, glad I was able to help.
DeleteDave, in tutorial B you suggest step 2 - "start at the area around the rotary switch... etc." is it possible for you to provide a photo of what this step looks like...I've looked extensively all over lots of 944 community resources, and I can't find any visuals for what this looks like...is the rotary switch perhaps part of the motor, so that it can only be seen when the motor is removed? any help you can provide would be most welcome.
ReplyDeleteYep, it's part of the lifting motor, see pictures 13,14,15,16 and 32 on this page.
Delete